So you want to host your own ai. I will say this out of the box, unless you have multiple 5090s you will not be running an AI that is as good as Chat-GPT. But if you are fine with that let’s get started.
Choosing Your Frontend
You will first want to choose a frontend for you to talk with an AI. There are multiple out there, but the one with the biggest community and support is SillyTavern. I recommend the SillyTavern Launcher which makes the installation a lot easier.
Installing the Launcher
To install the launcher you must follow these steps. First go to the folder where you want to install the launcher from. Then open up cmd in that folder (This can be done by right clicking inside of the folder and clicking Open in Terminal). Then paste these commands into the terminal.
cmd /c winget install -e --id Git.GitAfter this command finishes, type in the command.
git clone https://github.com/SillyTavern/SillyTavern-Launcher.git && cd SillyTavern-Launcher && start installer.batThis should launch the installer for the launcher.
Choosing Your Backend
Now that you have chosen your frontend you now have to choose the backend, which is what the AI will be hosted on. I recommend Koboldcpp, I will be talking about two different ways that you can install Koboldcpp.
It should be noted that while using Koboldcpp or any AI backend, that you should not run any video games or another application that takes up a lot of Vram.
Sillytavern Launcher
The first way that I will be talking about is the SillyTavern Launcher. What you will open the file, Launcher.bat, do not open launcher.sh as .sh files are for Linux systems.
Upon opening the file you should see these options.
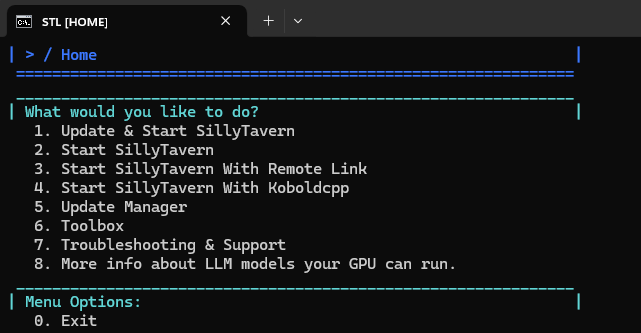
Enter option 6 (Toolbox). Then go to the App Installer (Option 2). Then go to Text Completion (Option 1). Then go to koboldcpp (Option 2). I recommend option 1, to install from a buildbuilt exe, since if you were confident enough to do option 2 you wouldn’t need a guide. Follow the installation guide. After a while you should have installed Koboldcpp through the launcher. This should allow you to start sillytavern with Koboldcpp.
Direct From Github/Source
The second way that I will be talking about is the Github, of Koboldcpp. To install Koboldcpp what you must do, is go to the releases tab on the right. Then click on the most recent release. Then scroll down to assets and choose either, koboldcpp.exe or koboldcpp_cu12.exe as either will work for Nvidia GPUs. If you happen to have an AMD GPU I recommend that you use the Vulkan option that is available in all releases.

Finding an AI Model
Now that you have your frontend and backend installed, it is time to get an AI model to run. I recommend you go to the Sillytavern’s subreddit and check out the weekly megathread, in which people talk about the current ai models. You can also ask people if they know of any model which would work well with your Vram and preferences. If you see people recommending models but aren’t linking them. That is because all models are on huggingface. Just search the name of the model and you should be able to find it by adding huggingface into google or by just searching in huggingface.
Though the model that I currently recommend is Mag Mell R1. This is a 12B model that performs surprising well, and is mostly coherent at Q4.
Running Your Model
What you want to do now is to run both Sillytavern and Koboldcpp. Sillytavern should open a tab on your browser by itself for now, but just ignore that. Now we will want to open up Koboldcpp.
Koboldcpp Loading
Koboldcpp should look something like this.
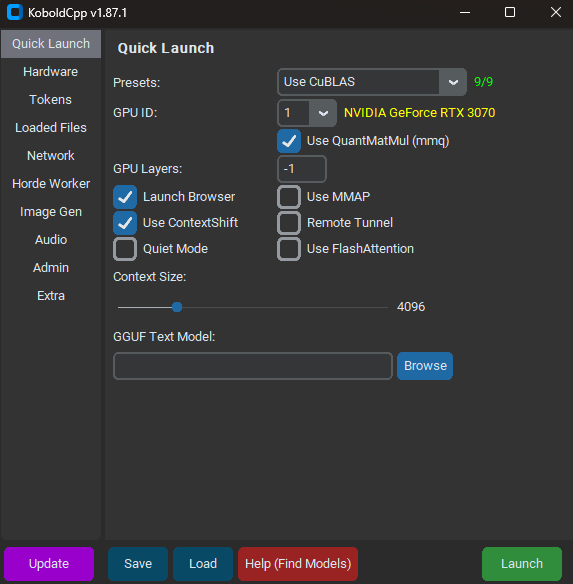
What you will first want to do is to click the browse button and go to where you stored your selected AI model. I will be using Mag Mell R1 in my example. You don’t really need to mess with Context Size, but if you find that your chats are reaching the context size limit and are become more and more incoherent, you may want to consider increasing it. Though it does have the downside of causing the AI’s generation to be slower. I recommend turning off Launch Browser as it will not be needed, and turning on FlashAttention as it will make the AI model run smoother. So overall your Koboldcpp instance should look like this.
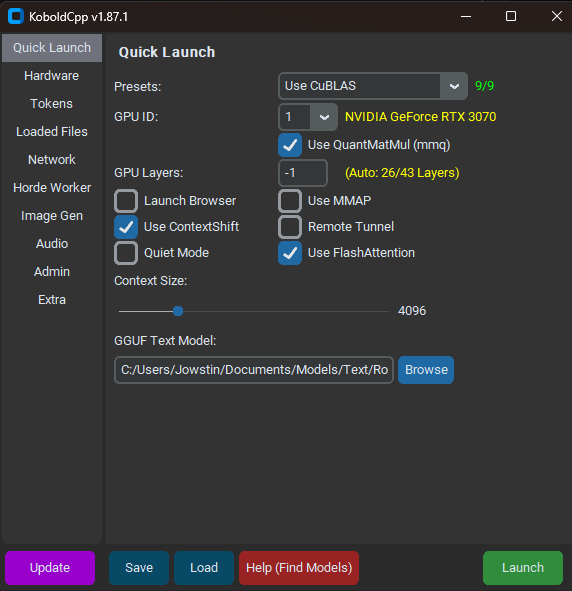
Finally click the launch button. This may take a few minutes on the first bootup as it will be download dependencies and stuff. But after a while the terminal where Koboldcpp is in should list something like this:
...
Load Text Model OK: True
Embedded KoboldAI Lite loaded.
Embedded API docs loaded.
======
Active Modules: TextGeneration
Inactive Modules: ImageGeneration VoiceRecognition MultimodalVision NetworkMultiplayer ApiKeyPassword WebSearchProxy TextToSpeech VectorEmbeddings AdminControl
Enabled APIs: KoboldCppApi OpenAiApi OllamaApi
Starting Kobold API on port 5001 at http://localhost:5001/api/
Starting OpenAI Compatible API on port 5001 at http://localhost:5001/v1/
======
Please connect to custom endpoint at http://localhost:5001
Copy down or remember that port as we will be using it later.
Sillytavern Launch
Now open up the Sillytavern tab. You will see that it may look overwhelming at first, but it is very simple once you get the hang of it.
For your first step, you will want to click on the plug icon. This will open up your connection screen. For you settings you should select.

- API
- Text Completion
- API Type
- KoboldCpp
- Koboldcpp API key (optional)
- Blank
- API URL
- (URL That was listed in your Koboldcpp terminal)
Then click connect. Overall it should look like the image.
Now you’re connected to Koboldcpp and are ready to go!
